


CHEESE ONION BREAD
For about 8 people
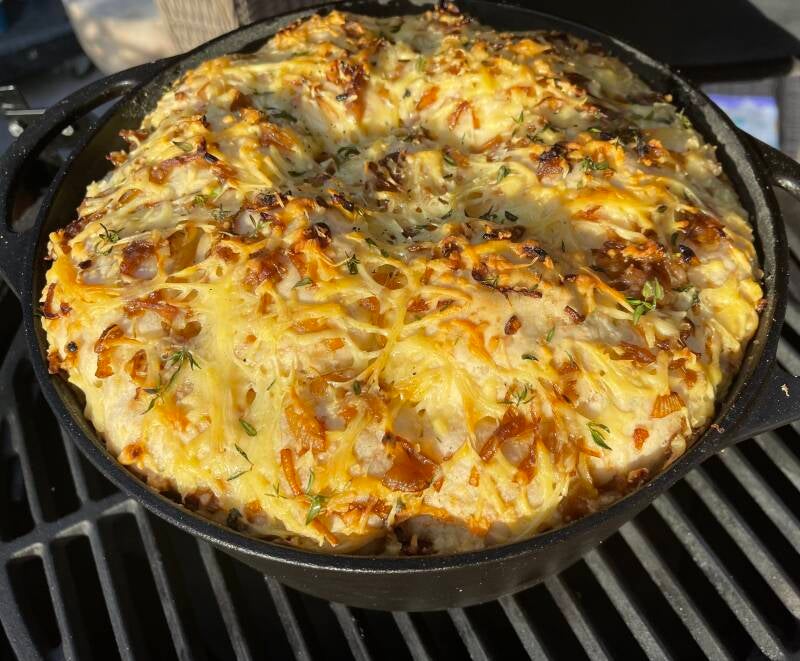
A delicious cheese-onion bread. Always good! Special in its simplicity, we enjoyed a great soft bread with a good ratio of onion and cheese. Nice and savory, with a hint of sweetness from the baked onions. This bread is highly recommended for a Lazy Sunday. This bread recipe is suitable for the average cast iron pan or Dutch oven, as you may see in the photos it has become a relatively large and high loaf that can be sliced well. If you want to make a smaller breakable loaf, you can simply halve the recipe. The bread will then better retain its break-bread shape. Although you do miss out on the opportunity to give the old leftover bread a second life and promote it into generous cheese sandwiches. Highly recommended and something that the whole thing is all about for us.
INGREDIENTS
- Patent flour, 800 grams
- Whole wheat flour, 200 grams
- Dried yeast, 14 grams
- Salt, 10 grams
- Lukewarm water, 650 grams
- Onions, 6 pieces medium
- Grated cheese (young matured), 200 grams
- Fresh thyme, about 20 sprigs
- Garlic granules, 8 grams
- Oil
- Flower to pollinate with
- Butter
NECESSETIES
- Cast iron pan with lid
- BBQ with lid and indirect heating option or oven
- Heat shield for kamado use or pizza stone
- Kitchen knife
- Cutting board Large mixing bowl
- Bowls
PRE PREPARATION
- Weigh all ingredients separately.
- Mix the dried yeast with the water.
- Mix the salt with the flour in a large bowl, pour in the water with the yeast and mix well for a few minutes until a whole is formed.
- Dust the worktop with flour and knead the dough well for about 10 minutes. Hold the dough with one hand and with the other palm, press the dough apart, squeeze and repeat. It is important to knead the dough well so that it becomes elastic and the gluten is activated, this ensures an airy bread.
- Form a large ball of the dough and then place the dough in a bowl. Cover the dough with a slightly damp tea towel. Let the dough rise for 1 hour at room temperature.
- Note that the dough doubles in volume, this can of course take a little longer or go a little faster. This is entirely dependent on room temperature.
- Peel all onions and cut four pieces into fine cubes.
- Place the cast iron pan on high heat and add some oil, fry the chopped onions until golden brown. Remove the chopped onions from the pan and let them cool in a bowl.
- Cut the remaining onions into fine rings and fry them the same as the chopped onions. Let the onion rings cool separately in a bowl.
- When the cast iron pan has cooled you can grease it with some oil of your choice and then dust with some flour, this will prevent the bread from baking in the pan.
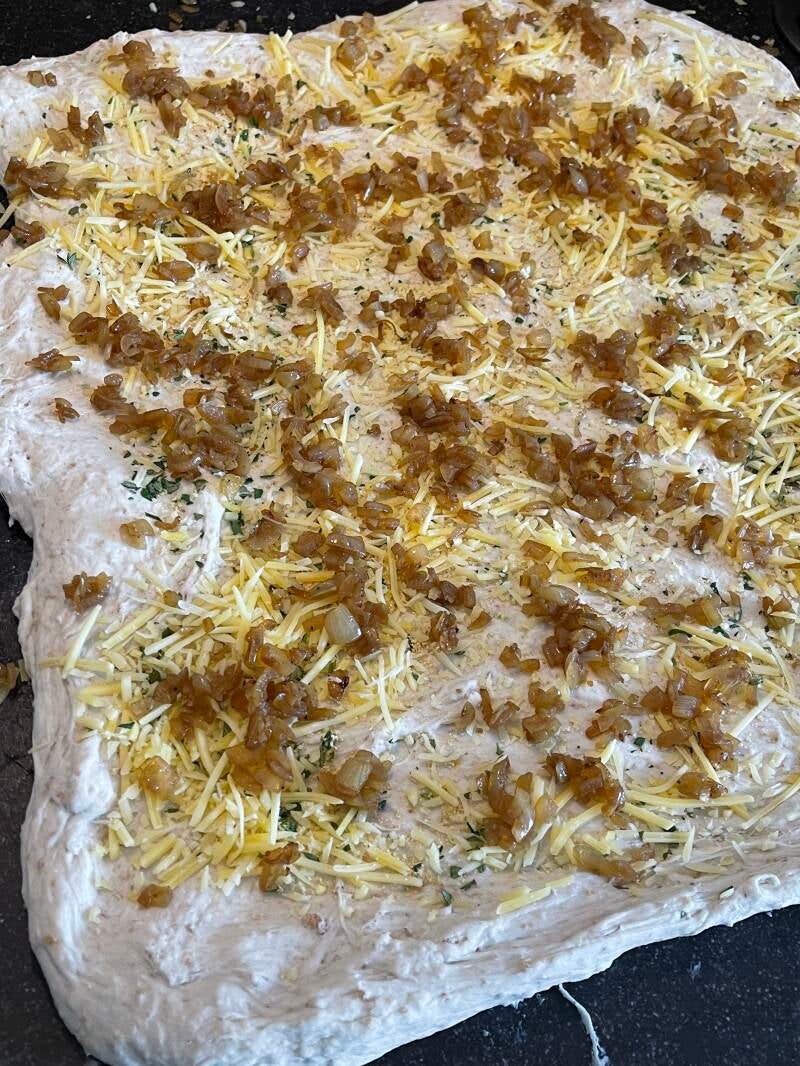
- When the dough has risen well, remove it from the bowl and pull the dough out into a large rectangular shape. Divide the fried chopped onion, 2/3th of the grated cheese, the leaves of 10 sprigs of thyme and the garlic granules. Now roll up the piece of dough and knead the dough well until all the ingredients stick well to the dough.

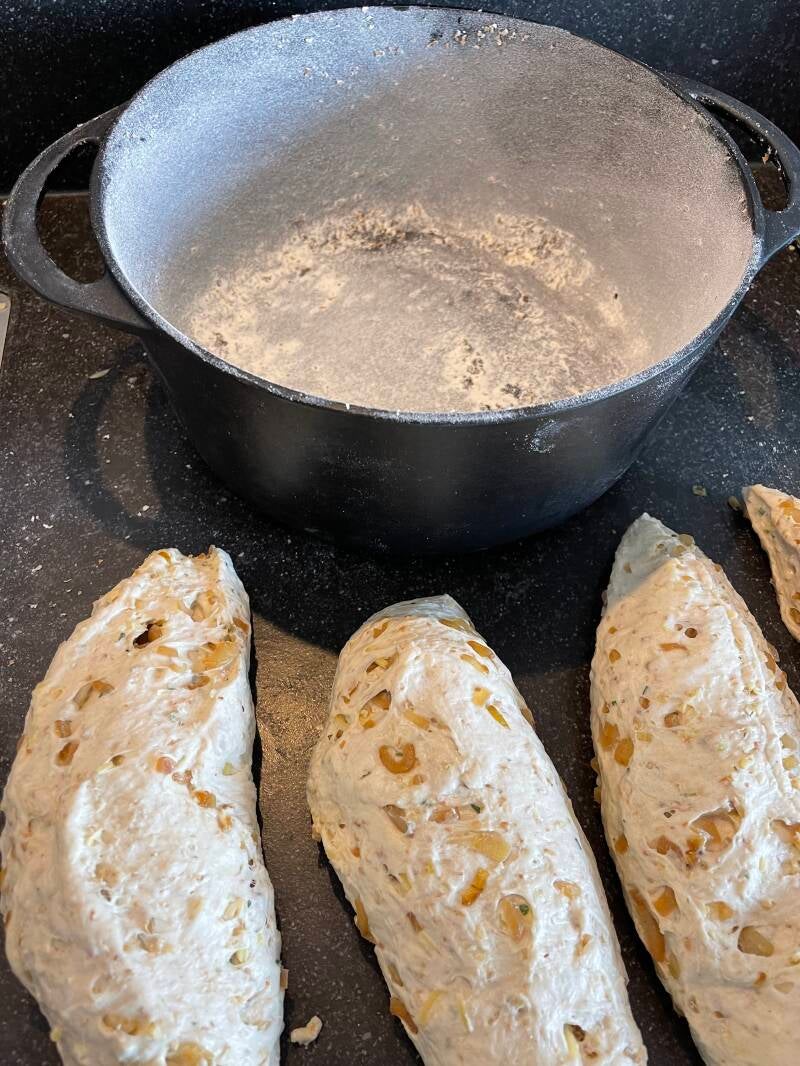

- Divide the dough into 4 equal parts and roll it out, now cut into balls from this, 19 balls fit in our pan.
- Sprinkle the worktop with flour and roll nice round balls of the dough with the inside of your palm. Use your hand as a bowl shape, you first press the balls flat on the counter and start to turn. While turning, fill an inverted bowl with your hand so that the dough develops a nice ball shape.
- Place the balls with the formed bottom at the bottom of the cast iron pan, this ensures that the dough does not tear strangely during baking but rises nicely.
- When you're done, cover the pan again with a damp tea towel and let the dough rest for an hour to 45 minutes. Again, the rising time varies and depends on the room temperature. So keep a close eye on the dough, we're aiming for a doubling in volume of the dough again.

PREPARATION
- After half an hour of rising time of the dough, the BBQ can be lit, preheat it well to 180 degrees.
- Of course, the bread can also be baked in the oven, but you will of course miss that delicious BBQ taste that gives this bread that extra nice twist.
- When the bread has risen and you think it is ready to bake, sprinkle the bread with the fried onion rings, the remaining cheese and the leaves of 10 sprigs of thyme.
- When using a kamado, place the heat shield and make sure the temperature in the BBQ remains around 180 degrees, anything between 160 and 200 degrees is acceptable, but this will have an effect on the baking time.
- Personally, I prefer to sit on the lower side, so that the onions and cheese don't get the chance to burn. A pizza stone can also be used as a heat shield.
- Place the cast iron pan with the bread in the BBQ and close the lid, ensuring a stable room temperature. Bake the bread for half an hour at 180 degrees and absolutely control the need to open the BBQ.
- After half an hour, reduce the room temperature to about 150 degrees. The bread has now risen and only needs to cook.
- Bake the bread for another half hour at 150 degrees.
- Now remove the pan with bread from the BBQ and put the lid on the cast iron pan, leave the bread in the pan with the lid closed for another half hour.
- After this the bread is certainly cooked and ready to be served, remove the bread from the pan and let it cool a little bit.
- Cut the still lukewarm bread and spread it with a lick of soft butter and enjoy the end result!


Reactie plaatsen
Reacties